Kia Optima Hybrid: Auto Head Lamp Leveling Device / Auto Head Lamp Leveling Unit Repair procedures
Kia Optima Hybrid (TF HEV) 2016-2020 Service Manual / Body Electrical System / Auto Head Lamp Leveling Device / Auto Head Lamp Leveling Unit Repair procedures
| Inspection |
| 1. |
Ignition "ON". |
| 2. |
Turn on the head lamp switch. |
| 3. |
Check for operation. If the aim of the head lamps changes smoothly when the head lamp leveling switch is turned. |
| 4. |
If the operation does not work well, inspect the connector and terminals to be sure they are all making good contact.
If the terminals are bent, loose or corroded, repair them as necessary, and recheck the system.
If the terminals look OK, go to step 5. |
| 5. |
Substitute with a known-good head lamp assembly and check for proper operation. |
| Removal |
| 1. |
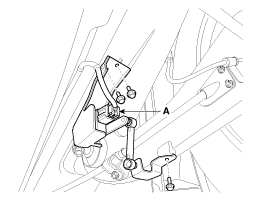
Remove the head lamp leveling unit connector (A).
|
| 2. |
Loosen the mounting bolts (3EA) of automatic head lamp leveling unit assembly.
|
| 3. |
Remove the head lamp leveling unit assembly. |
| Installation |
| 1. |
Install the head lamp leveling unit. |
| 2. |
Reconnect the head lamp leveling unit connector. |
 Auto Head Lamp Leveling Unit Description and Operation
Description According to driving environment and loading state of vehicle, head lamp lighting direction is changed to keep the driver''s visibility range and to protect the driver''s vision from glare, ...
Other information:
Kia Optima Hybrid (TF HEV) 2016-2020 Service Manual: Purge Control Solenoid Valve (PCSV) Specifications
Specification ItemSpecificationCoil Resistance (?)19.0 ~ 22.0 [20°C(68°F)] ...
Kia Optima Hybrid (TF HEV) 2016-2020 Service Manual: Transaxle Oil Temperature Sensor Specifications
Specifications Type: Negative Thermal Coefficient Type Temp.(°C)°FResistance (k?)(-40)-4046.8(-20)-4.015.6(0)32.05.88(20)68.02.51(40)104.01.17(60)140.00.59(80)176.00.32(100)212.00.18(120)248.00.11(140)284.00.07(165)329.00.04 ...
© 2025 Copyright www.koptimatfhev.com


